Graphic Buds
Drawing Faces
A tutorial found HERE by Sandy
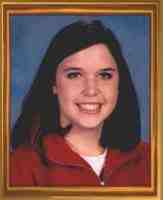
I decided to try my hand at this tutorial. I used a picture of my daughter to work from. I made a few changes in her technique, but was basically pleased with result
Original Photograph
My Portrait
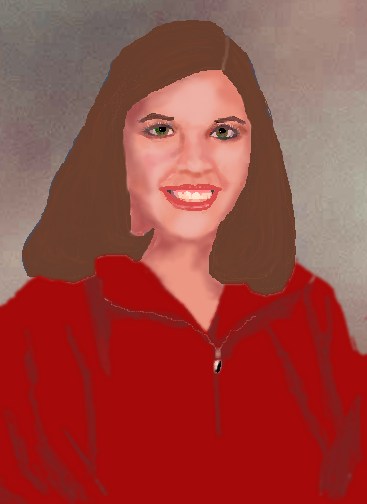
What I Did
I'll have to admit I didn't follow the tutorial exactly but it was my inspiration and I would have never tried this without the tutorial.
SKETCH
In order to get the sketch to work from (since I'm not an artist) I copied picture onto a new image.
I then added a new layer to work on and lowered the transparency of the original picture in order to see my lines clearer.
Using a color that would stand out from my picture I used the preset shapes (vector) to draw outline of face and eyes. Converted to raster layer
I then used point to point line on draw tool for other features such as nose, lips, teeth, hair, teeth, shirt, shading lines, etc.
I merged all drawing layers.for my sketch. This layer was named SKETCH
Deleted layer with original picture.
PAINTING (NOTE: I kept original picture open for reference and color selections)
Another NOTE: I kept the SKETCH layer on top throughout entire process
I then made another layer (EYES) and painted in eyes. Again I did just basic colors with no shading for this layer and the following layers until I got basic features in.
Made another layer (Lips) and painted those in
And another layer (Teeth) and painted teeth and gums in.
And another (Hair) and painted hair in
And another (Shirt) and painted shirt in.
SHADING
SKIN LAYER: Using air brush set on very low opacity and differing sizes and selecting colors from my original picture, I drew in nose and added shading to the face and throat area. In some portions I used Retouch>Darken RGB or Lighten RGB. I then used Retouch>Smudge to blend and also Retouch>Soften to make transitions from dark to light smoother.
OTHER LAYERS: I followed the same procedure as for skin but varied opacity also as needed.
When I finished portrait, I went to original background layer and added new background. Duplicated picture then merged one and saved as JPEG. ( The other PSP formatted one I kept in case I wanted to do changes later.

Created July 10, 2002